Home

Friday, November 27, 2015

Andrews and Lockhart Bench


This bench had belonged to a girlfriend of mine and was crying out for a redo! For $10 I brought it home and gave it a new life!  


Again, I used my own white chalk paint recipe, probably 2-3 coats.  I painted a grain sack stripe in red along the top,  and then I distressed it just at the edges and on the front.  To paint the grain sack I just used some painters tape and kind of eyed it where I would like it to go. I used an artists brush to paint the red paint on. I used an acrylic paint I had from another project I used.


This is the piece with just the chalk paint and after I distressed it. I was kind of tempted to leave it as is, but I had downloaded a great typography graphic from the website The Graphics Fairy. She has so many wonderful images on there that are copyright free and you can use them on your own projects!!


I used Valspar's translucent color glaze in Mocha to give an even more aged appearance to the trunk. I brushed it on and then wiped it off with a clean rag. I let it collect in the corners and in the grooves of the squares in the front.


After the images and the glaze had been applied!


Image from Graphics Fairy


I used an overhead projector to project the image onto the trunk.  I copy the image from the website and then I go to Staples and I have them make me an acetate so I can use it on the overhead projector.  I trace the outline of the image on to the piece and then I go back in with a fine brush and usually acrylic paint, in this case black and I fill in the image and the lettering.


So this is the final product! 
I  forgot to add that I also used a laurel wreath stencil on the front of the trunk that I also got from The Graphics Fairy.  Once the image is thoroughly dry I apply the glaze with a brush and then wipe off with a rag.  I waxed the entire piece with Johnson's paste wax and buffed to a shine.

I love how this piece came out! Let me know what you think!


Tuesday, November 17, 2015

Duck Egg Blue French Provincial Desk


This French Provincial desk was so much fun to restore and paint! My friend gave me an inspiration picture she had found on Pinterest...


She wanted me to try and achieve this look with a desk that she had had for years but never got around to doing anything with.
I stripped the drawers and sanded them well, however, the wood that was used wasn't the greatest, so when I applied the stain, the coverage wasn't as even.  However, I really liked the drawers looking so rustic and thankfully so did my friend!

Because the top was going to get a lot of use, and it was a laminate, I used Benjamin Moore's Advance paint in White Dove.  I used a eggshell finish. I applied 3 coats and then I applied a polyurethane as well just in case. I don't want that baby to chip!


I used Behr paint and primer in one in Gray Morning flat finish to give me that duck egg blue color.


This was the before, the legs needed to be repaired as well.


I left the hardware alone and didn't paint it.  I liked the distressing that was already on there, and thought it went well with the rustic feel of the drawers.


I used white acrylic paint to paint the foliage detail on the sides.   I just used a very fine brush to make tendrils and vines.


I polyurethaned the entire piece except for the drawers which I used Johnson's paste wax on.


Saturday, November 7, 2015

Driftwood Finish Dining Table

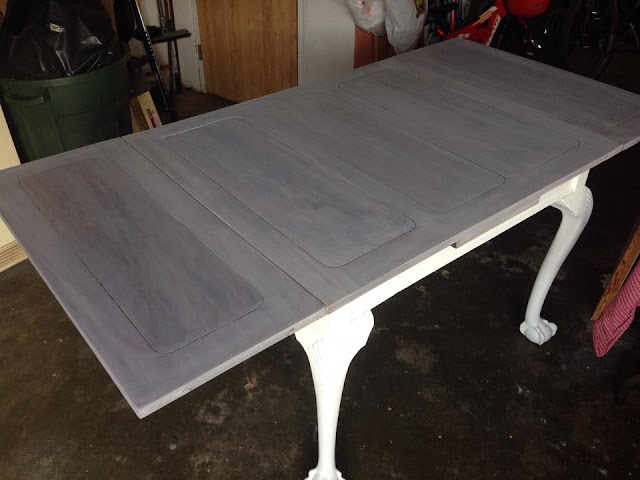
Another neighbor to the rescue! His sister was getting rid of this gorgeous refractory dining table which unfortunately had a bit of damage to the top.  The piece has three veneer panels and one of them had bad water damage.  The table opened up to reveal two leaves on either side. And look at those ball and claw feet! To die for!


I was thinking about painting the top of the table because of the damage,  but I really wanted to preserve the beauty of the wood. As I started sanding it down, it revealed a beautiful wood grain beneath all the layers of lacquer.  I decided to replace the damaged veneer with a new piece, the only problem was it didn't match the other two existing pieces that weren't damaged.  

I cut the piece of  veneer to fit in the old spot using my jigsaw.  I attached it using small brad nails and some wood glue. 


I decided to use Minwax stain in Classic Gray to make the top totally seamless and uniform.  This way, it would hide the fact that the replacement veneer was a different color.  I just rubbed it on and it turned out beautifully!


The bottom was painted in white homemade chalk paint.  I lightly distressed the ball and claw feet.  I think by painting the base, it really brings out the lines of the piece and the details on the legs and feet.
I applied 3-4 coats of  an oil based polyurethane to the top to make sure there would be enough protection. I also used it on the base as well.  I sanded down after each coat to give it a seamless finish,


My son's 2nd grade teacher ended up buying this from me!! She paired it with rattan chairs and it looks unbelievable! What a transformation!

Friday, November 6, 2015

Grain Sack Cubby Cabinet


 It happened again! Another diamond in the rough on the side of the road! My two boys are so used to me hitting the brakes and veering in to the shoulder just so I can get a peek at a piece of furniture someone has left out for the garbage men! Well, luckily for me this was getting thrown out  two doors down from my house so I didn't have to travel that far!!


This was such an adorable cabinet and it looked like it had been maybe used in a nursery school. It had stickers plastered all over as well as names of the kids that used the cubbies.  


I used a paint color from Home Depot Behr's paint and primer in one in  Ashwood in a Matte finish for the inside of the cabinet. What a pain in the neck!! I needed about 2-3 coats to give enough coverage.


I used my homemade chalk paint recipe using plaster of paris and water mixed with latex paint.  I painted the entire piece.  Here, I just used a white that I had on hand already.


I


I painted a grain sack stripe using painter's tape to tape off the design and I filled it in with the same color I used for the inside of the cabinet.  I distressed the entire piece using my hand sander and sanding sponges.


I found a font that I liked on the computer and I printed out the letters and numbers that I wanted.

I usually use a cray pas or dark lead pencil to scribble all over the back of the photocopy so it makes a carbon copy.  Then I attach the page onto the area I want the image to be with blue painter's tape.  I trace over the image with a ball point pen, usually red so I can see where I've traced.  When that's done, I remove the page, and I use a very fine brush and fill in with a watered down paint. In this case I used black.


What a beauty this one turned out to be! 
When the hand painting and distressing was done, I waxed the piece using Johnson's Paste Wax I found at Home Depot.   I really gives a nice sheen and protection to the piece. 

Tuesday, October 27, 2015

French Cane Back Dining Chairs


I had found these old unwanted dining chairs and wanted to try and do something really unique with them.  I cleaned them, took off the old disgusting fabric and went to work.  I mixed up some homemade chalk paint by using plaster of Paris and a little water and adding it to the paint. This was just a white paint that I had lying around from another project.  


The before...the lines were great on these chairs, I knew the caning would look amazing painted.


After painting them white, I dry brushed a light gray over them to give the, a timeworn, antique French feel.  Then, using my sander I went to town on sanding all the edges.


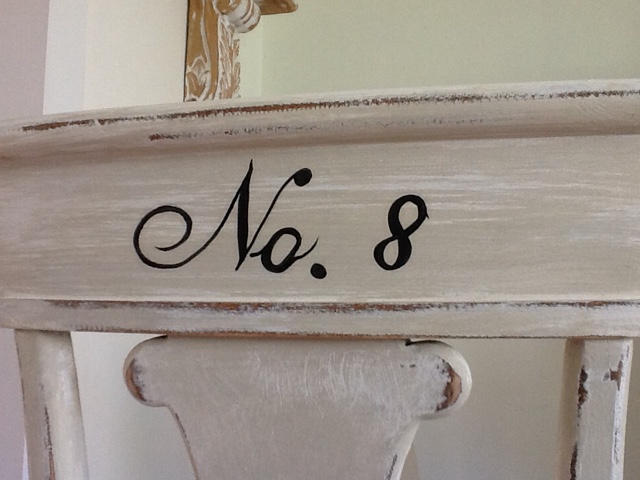
I went on my computer and printed out the numbers and letters in the font that I liked, then I used a craypas crayon to color the back of the paper giving me in essence a carbon copy. Then I taped the image onto the area I wanted and traced with a red ball point pen. This lets the color from the craypas show through on to the chair. 


Then I took black paint and I filled in the tracing! Every chair had a different number.


When the chairs were all complete I waxed them with Johnson's paste wax and buffed them to give them protection.


I finally covered the chairs with drop cloth that I had prewashed. 


French Typography Dresser


So this is the before....a tired looking green painted maple dresser I picked up at a garage sale for a song.
I decided to use a graphic from The Graphics Fairy website and go to town!


I used an antique white chalk paint first and then mixed up a custom glaze in a mocha brown.
I dry brushed it on and then distressed the whole piece. 


The top I sanded  and then stained in a driftwood stain, I think it was Minwax Classic Gray.


Papillion Duck Egg Blue Dresser

My friend gave me this old dresser that she was getting rid of and I couldn't wait to get stared using a graphic from The Graphics Fairy!! The Papillion image was so gorgeous and I knew this piece was the perfect canvas for it.


 I took all the hardware off and spray painted them with Rustoleum's Oil Rubbed Bronze, my go to color for hardware these days.


This is the image projected on to  the piece. I went to Staples and made a transparency of the image.
This works perfectly for me. I love how I can make the image bigger or smaller depending on the piece of furniture I have.   I outline the image in chalk or pencil and then using a fine brush I fill in the image. In this case, I used white paint.


Luckily, after hearing about my search for an overhead projector on Facebook, my seventh grade social studies teacher came through for me and found one


I primed the piece first , and then I mixed up my own chalk paint recipe in a Robin's Egg Blue Color.
After painting the image on the piece, I lightly distressed it with a sanding sponge to give it an aged, antique feel. 


I distressed the edges which brought out some of the white primer and the  green paint that was previously painted on there.  I loved the effect.


To protect and finish it, I applied Johnson's Paste Wax to give it a nice sheen and smoothness to the dresser.


I love how it came out! This was really the perfect image for this piece! Thank you again Graphics Fairy!!